🚀NEW YEAR: SAVE UP TO 75% OFF+FREE SHIPPING | Ends in
6TH GEN BRONCO FRONT SEAT RISERS AND UNDER SEAT MOLLE PANEL


INTRODUCING THE BRONCO SEAT LIFTERS FOR THE 6TH GEN BRONCO-A SEAT RIDE HEIGHT ADJUSTMENT SPACER THAT WILL INCREASE YOUR RIDE COMFORT
One of the first things that I noticed upon picking up my new 6th Gen Bronco was the fact that the front seats sat so low.
The Seat lifters help to increase the height of your seat and increase leg support overall. So whether you’re a 5’9 guy like me that needs a bit more ride height or a 6’3 guy looking for more legroom, the Seat lifters are for you. Both Seat lifters and MMP are very popular in the Toyota market and I feel like they are going to be very well received by the Bronco audience because the seats sit so low.
Tired of feeling like you’re sliding forward in your Bronco? Looking to get planted in your seat and actually use the lumbar support? Then its time to find that perfect seating position and get comfortable. The Adjustable Front Seat lifters will lift the front of your Ford Bronco front seats. The kit is user adjustable in .375 inch increments and will lift the front of your Driver or Passenger seat from .375 inches to 1 inch. These will help you find that reclined seating position that just isn’t available in a stock Bronco.
The spacers are CNC milled and designed to accommodate the factory seat rail pin and the provided hardware.
Compatible with the front seat lifters, having quick access to gear and accessories under your seat is key. From self-defense to a fire extinguisher to something simple like a molle pouch – having under-seat quick access can make your automotive driving experience much more convenient. Some of the more common tools you need quick access to include small flashlights, handguns, knives, multi-tools, magnetized gear, molle pouches, and more. I have seen some guys even mount footwell LED lights on their under-seat mounted panels. Regardless of what you mount on your panels, you have plenty of options to get creative.
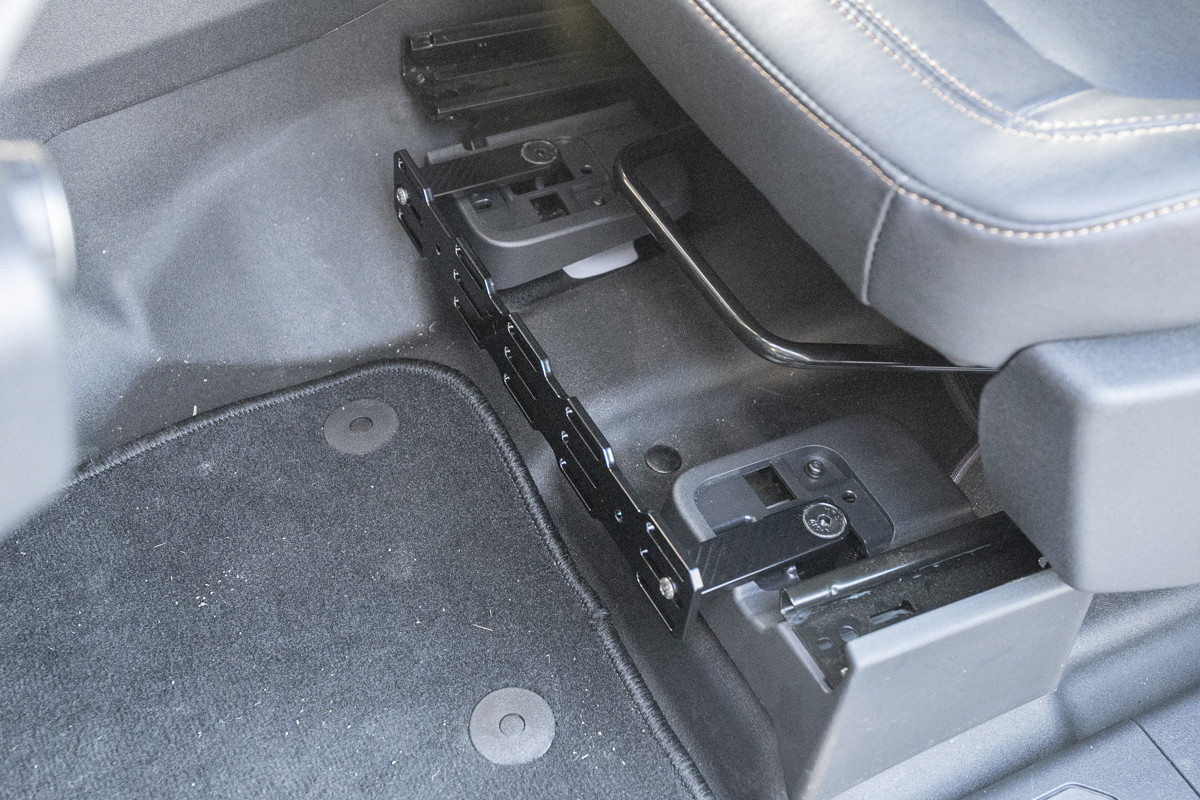
The multi-mole panel has a unique slotted honeycomb design that features both holes for bolts and slots for straps. The design allows you to bolt or strap just about anything you can think of through the MMP. You can use something simple like #10-24 bolts, nuts, and washers or MOLLE-specific gear from a company like 5.11 tactical.
PRODUCT OVERVIEW


The Seat lifters and mmp come with all hardware you need. The spacers, and the bolts. The product features one spacer with a cutout slot and one with a raised portion, designed to lock into each other.
You can lift your front seats by .375 (3/8) inches with one spacer and up to 1 inch with both spacers.
STEP 1. POP CAP ON SEAT PLASTICS

This is the placement you want your plastic pry tool. Pop this tab and move to the next step.
STEP 2. REMOVE THE CAP ON THE SEAT PLASTICS

Here is that cap that popped up.
STEP 3. REMOVE FRONT 13MM BOLT

Start with a manual ratchet driver to break the 13mm loose.
STEP 4. MILWAUKEE DRIVER

The bolts are pretty long so I moved over to a 3/8 Milwaukee driver once the bolt was loose.
STEP 5. REMOVE THE REAR SEAT 13MM BOLT

Break the rear bolts loose by only 5-7 turns but do not remove them entirely.
STEP 6. LIFT THE FRONT OF THE SEAT

Prop the front seats up.
STEP 7. POSITION SPACERS UNDER SEAT

The perfect circle hole goes under the rail pin. The radius circle goes under the provided hardware from DDI.
STEP 8. SET SEAT ON SPACERS

This part was a bit tricky.
Because the back bolts were loosened it caused the seat to tilt up pushing the seat forward which prevented the rail pin from seating properly back into place. I was able to get one bolt threaded halfway down (closest to the door). Once that bolt and pin were in place I moved to the other side and yanked the seat forward. That dropped the rail pin in place allowing me to drop the pin and the bolt in place.
STEP 9. BOLT DOWN 13MM PROVIDED

Once your seats are down, apply some blue Loctite, and secure all your bolts in place (front + rear). Finally, place all your plastic caps back on.
STEP 10. PREP MOLLE MOUNT BRACKETS

Unpack and prepare your MOLLE panel brackets.
STEP 11. APPLY LOCTITE (BLUE)

Apply a small amount of blue Loctite.
STEP 12. INSTALL BRACKETS AND MOLLE PANEL

Mount your MOLLE panel onto the brackets.
SIDE VIEW

Here is a side profile look at how the MOLLE panel sits.
SIDE VIEW (PLASTICS RE-INSTALLED)


Here is a look at the plastics after they have been reinstalled. They obviously sit higher as the seat has been lifted, however, it’s not going to be something you stare at every day. It’s also not as noticeable looking down on it from above.
FINAL THOUGHTS


Game = Changed with these Killer products!
Before the Seat lifters, I was sitting low and my leg/back positioning was really off.
After the Seat lifters, my ride height is not only higher but my lower back, and leg positioning is much… and I mean much more comfortable.
I have these on the driver and passenger side now so I have quite a few options. Some of the accessories I plan on mounting include a flashlight, a small MOLLE pouch, Element Fire Extinguisher, and potentially a Midland or Boafeng mount. So many options for keeping things organized.
SHARE
Leave a comment
Related post
6TH GEN BRONCO FRONT SEAT RISERS AND UNDER SEAT MOLLE PANEL
don't take our words check what others have to say
JOIN OUR COMMUNITY
RECEIVE OUR LATEST PRODUCT DROPS PROMO CODES & CONTESTS
